

What if the biggest risk in an internet-facing scan isn’t a missed vulnerability, but a target you weren’t authorized to test? That’s a real concern for security teams working across cloud accounts, domains, APIs, and third-party infrastructure. Noisy findings and unclear priorities can add uncertainty instead of clarity.
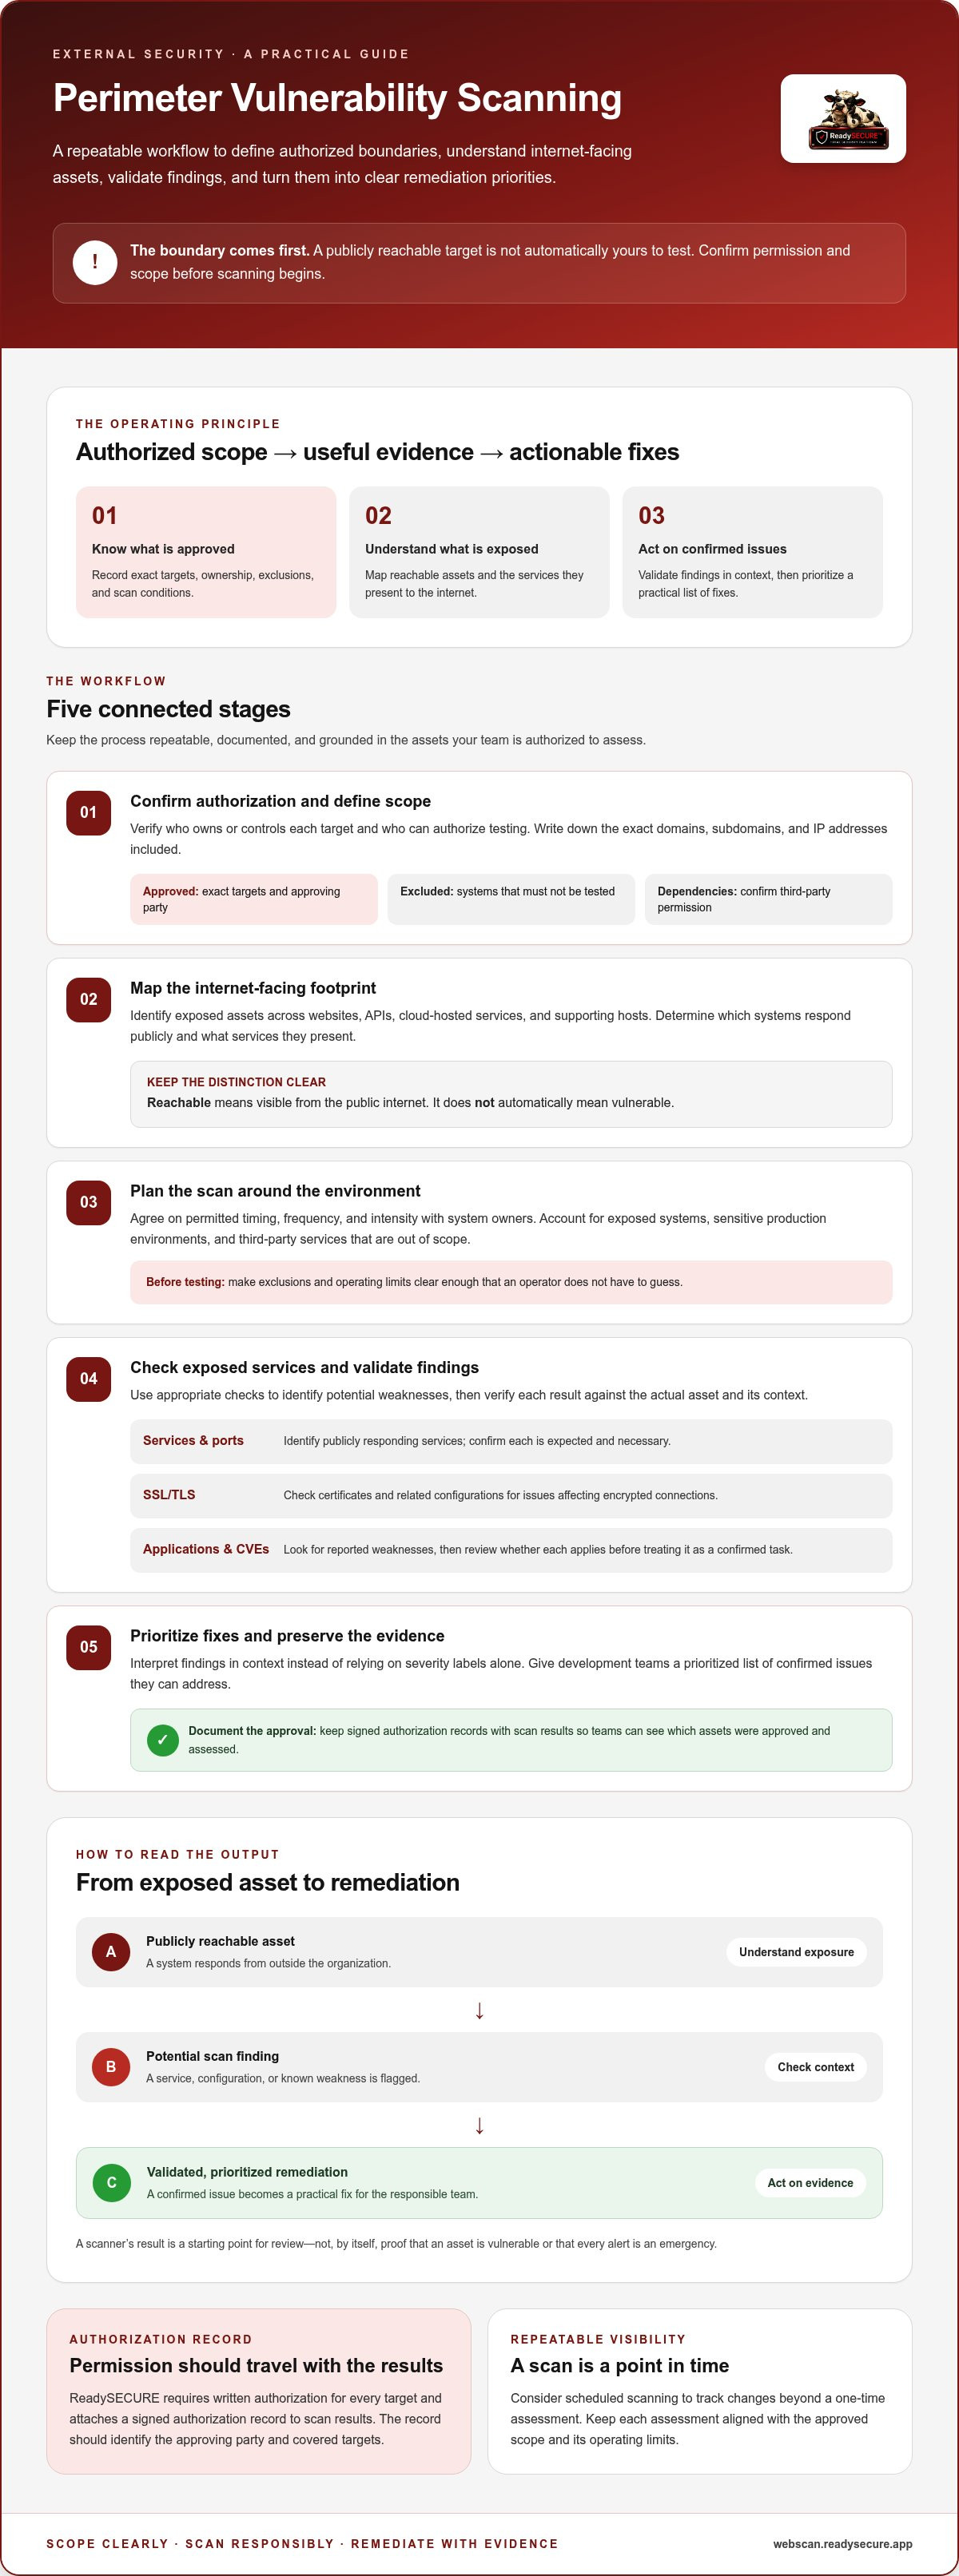
A reliable perimeter vulnerability scanning workflow starts with a defined scope and written authorization. It uses appropriate checks to identify exposures, validates findings, and ranks confirmed issues so developers know what to address first. Keeping signed authorization records with scan results also documents what was approved and tested.
This guide explains how to build that process. You’ll learn how to confirm ownership and scope, plan scans with exposed systems in mind, interpret findings, and turn them into a practical remediation list. The goal is a repeatable approach that respects authorization boundaries and gives your team evidence it can act on, not just a longer list of alerts.
Key Takeaways
- Build perimeter vulnerability scanning around a clearly defined, authorized scope. Approve each target before testing begins.
- Use a repeatable discovery process to map exposed assets and identify the services they present to the internet.
- Assess scan results in context rather than relying on severity labels alone, then give development teams a prioritized list of fixes.
- Keep signed authorization records with scan results to document which assets were approved and assessed.
- Consider scheduled scanning to track changes beyond a one-time assessment.
What is Perimeter Vulnerability Scanning and Why Does it Matter?
Perimeter vulnerability scanning identifies security weaknesses in assets reachable from the public internet. The scope may include websites, APIs, cloud-hosted services, and the hosts that support them. The aim is to understand what an external party can see: which systems respond, which services are exposed, and whether known weaknesses or configuration issues need attention.
This external view complements internal network scanning. An internal scan examines systems from inside a network, where access and visibility may differ. A perimeter scan starts outside the organization and checks the boundaries public users, customers, and potential attackers can reach. Together, these perspectives support vulnerability management, the broader process of identifying, assessing, and addressing security weaknesses.
The Evolution of the Digital Perimeter
The perimeter is no longer just a firewall around a fixed office network. Cloud services, hosted applications, and APIs can operate across different environments, so the effective boundary is the collection of assets exposed to the internet. An exposed asset is not automatically vulnerable, but it is reachable and should be understood. Pay particular attention to APIs: overlooked endpoints can provide access to data or application functions.
Core Objectives of a Perimeter Audit
An external scan should help you identify findings your team can verify and act on:
- Exposed services and open ports: Identify which network services respond publicly, then confirm that each is expected and necessary.
- SSL/TLS certificate issues: Check certificates and related configurations for problems that could weaken the security or reliability of encrypted connections.
- Known application vulnerabilities: Look for reported weaknesses, including CVEs, that may affect web applications or the software they expose. Review each finding before treating it as a confirmed remediation task.
These checks provide external visibility, not a complete picture of security. A scanner may identify a version or configuration associated with a known issue, but the result should be validated against the actual asset and its context. That helps teams avoid treating every alert as an emergency.
Authorization matters as much as coverage. Before testing a domain, subdomain, or IP address, establish that you have permission to scan it and define the approved scope. ReadySECURE requires written authorization for every target and attaches a signed authorization record to the results. This documents what was assessed and gives security and development teams a basis for reviewing findings.
Establishing Legal Authorization and Scope
Before perimeter vulnerability scanning begins, confirm that every target is within your authority to test. A domain used by your organization may rely on infrastructure operated by a cloud provider, hosting company, or other third party. Using a service or linking to a system doesn’t necessarily mean you own or control the underlying asset. Verify who can authorize testing and whether additional approval is needed.
The Ethics of Authorized Scanning
Written authorization creates a record of what testing is approved. ReadySECURE requires a signed authorization record for every target and attaches those records to the results. This helps teams distinguish approved security work from activity outside the agreed scope. It isn’t a substitute for legal advice or a guarantee of legal protection, but it documents permission and can support internal reviews, audits, or conversations with insurers.
Don’t scan a system simply because it’s publicly reachable. Confirm that you control the asset or have explicit permission from the party that does. Keep the authorization with the scan report, and make sure the record identifies the approving party and the targets covered.
Defining Your Scanning Boundaries
Make the scope specific enough that an operator can tell what is included without guessing. Record exact domains, subdomains, and IP addresses, and distinguish owned assets from third-party-managed dependencies. For each external dependency, confirm whether its owner permits scanning and what approval process applies. Authorization for one hostname doesn’t automatically cover related systems.
Before the first scan, agree on exclusions and operating limits with the people responsible for the environment. A practical scope document can capture:
- Approved targets: List the exact hostnames and IP addresses, along with the owner or authorizing contact.
- Excluded systems: Identify sensitive production environments or third-party services that must not be tested.
- Scan conditions: Set permitted timing, frequency, and intensity with system owners, especially when performance or availability is a concern.
- Communication and records: Notify security, development, and operations stakeholders. Retain approvals, scope changes, and resulting reports together.
Clear boundaries reduce the risk of accidentally testing someone else’s infrastructure and help teams respond if a scan affects a service. They also make repeat assessments easier to compare: the team can see which assets were authorized, what changed, and whether new approval is needed. If you’re ready to assess an approved target, review the ReadySECURE Free Scan as one option for an authorized scan.
Executing a Comprehensive Perimeter Scan: A 5-Step Process
A reliable perimeter vulnerability scanning workflow moves from discovery to targeted checks, then brings the results together for review. Keep each scan within the approved scope, record the configuration used, and investigate findings before treating them as confirmed risks.
- Discover assets and map ports. Start with the authorized domains, hostnames, and IP addresses. Use Nmap Port Scanning to identify responding hosts and exposed ports. Compare the results with your asset inventory, then investigate unexpected systems or services before scanning further.
- Identify services and versions. Determine what software appears to be listening on each open port. Version fingerprints can help you check whether a service may be affected by a known vulnerability, but they are clues, not proof. Validate them against the asset owner’s records and configuration.
- Test web applications and APIs. Use ZAP active and passive scanning to examine in-scope applications for potential weaknesses. Passive checks analyze observed traffic, while active tests send requests that may affect application behavior. Confirm active testing is appropriate for the target, and avoid production functions that could change or delete data.
- Inspect SSL/TLS configuration. Run a TestSSL Inspection to review how the service handles encrypted connections and identify certificate or configuration concerns. Check that each finding applies to the correct hostname and endpoint, especially when different services use different certificates.
- Assess risks with templates and network checks. Nuclei Template-Based Scanning can test for conditions covered by selected templates. OpenVAS Network Scanning can add broader vulnerability checks across exposed network services. Review each alert against the actual software and configuration before assigning remediation work.
Use Each Scanner for a Clear Purpose
Tools are complementary, not interchangeable. Nmap helps establish which ports and services are visible; OpenVAS checks for known network weaknesses; ZAP focuses on web application traffic and behavior. TestSSL examines TLS configuration, while Nuclei applies templates to detect specified conditions. Choose checks that match the asset and approved scope rather than running every test indiscriminately.
Correlate Findings Before Acting
Different scanners may report the same issue in different ways or flag a condition that doesn’t apply in context. Group related results by asset, compare the evidence, and note what needs validation. A consolidated view helps teams distinguish confirmed issues from leads for investigation and assign clearer work to developers. Retain the scan settings and target list so future results can be compared consistently.
Moving from Discovery to Remediation: Analyzing Results
A scan report is a starting point, not a patch list. Severity labels help sort findings, but they don’t establish how likely a weakness is to be exploited or what harm it could cause on a particular asset. For each result, confirm the affected software and configuration, check whether the asset is internet-facing, and assess available evidence of exploitation alongside the asset’s business importance.
CVSS scores describe the technical severity of a vulnerability. High, Medium, and Low ratings are useful signals, but they don’t provide a complete ranking of work. A lower-severity issue on a sensitive, exposed system may deserve attention before a higher-severity issue on an isolated asset. A scanner may also identify a theoretical condition that isn’t exploitable in your environment. Validate the finding and record the evidence before assigning a fix.
Building a Prioritized Remediation Plan
Start with Critical findings that have known exploits and affect reachable, important assets. Then assess other issues using exploit evidence, exposure, asset criticality, and existing safeguards. Group related findings when one change can address several instances, such as updating the same vulnerable component across multiple hosts or correcting a repeated TLS configuration issue. Grouping can make remediation more efficient, but include asset-specific verification in the plan.
Turn each confirmed finding into a trackable item. Include the affected asset, evidence, likely impact, recommended action, owner, and status. For issues that can’t be fixed immediately, record the reason and the next review point so they don’t disappear from view.
Communicating with Development Teams
Give developers enough detail to reproduce or verify the issue: the affected endpoint or service, the observed condition, why it matters, and a practical remediation direction. Filter duplicates and label unverified results clearly. This reduces security fatigue and gives security and development teams a shared basis for deciding what to fix first.
Repeat scans can show whether exposure is shrinking or recurring. Vulnerability trend analysis can connect scan results to team measures such as open findings by severity, time to close confirmed issues, and recurring weaknesses. Compare like with like: asset scope and scan settings should be consistent enough for the trend to be meaningful.
ReadySECURE provides prioritized reporting with remediation guidance to help development teams turn findings into assigned work. To review an authorized scan option, explore the ReadySECURE Free Scan.
Automating Your Defense with ReadySECURE
A one-time scan shows what was exposed at a particular point in time. Cloud infrastructure, applications, and APIs change, so that snapshot can become outdated as assets appear or configurations shift. A repeatable scanning schedule helps teams reassess approved targets and compare findings over time. Read more about continuous vulnerability scanning and how it can fit into a broader security workflow.
Why Automation Supports Consistency
Scheduled checks can help teams notice changes, including assets that may have been added outside the usual inventory process. They don’t replace ownership checks or authorization: every target still needs approval, and new systems should be added to scope before scanning. Set scan frequency and conditions with service owners so the process fits the environment and avoids unnecessary performance concerns.
Consistent results also support follow-up. Comparing scans can help teams see whether a finding remains open, has returned, or appears on a newly assessed asset. ReadySECURE attaches signed authorization records to results, documenting approved targets alongside the findings. For SaaS environments, scheduled network security scans can make recurring reviews part of the operating process.
ReadySECURE: Authorized Scanning for an Ongoing Workflow
ReadySECURE provides authorized vulnerability scanning for websites, APIs, and internet-facing hosts. Its scans use six industry-standard scanners, including Nmap, OpenVAS, ZAP, TestSSL, and Nuclei, with tools assigned to checks across exposed services, network vulnerabilities, web applications, templates, and TLS configuration. The combined results include prioritization and remediation guidance, giving security teams clearer next steps to share with developers.
Start with a one-time ReadySECURE Free Scan for an authorized target. Before submitting it, confirm that you control the target or have written permission to scan it. If you need recurring assessments, ReadySECURE Paid Plans support scheduled scans, history, and trend analysis. Keep the scope current as infrastructure changes, and review each report with the teams responsible for the affected assets.
For a practical next step, start your authorized perimeter scan with a target you’re permitted to assess.
Make Your Perimeter Scanning Repeatable
Strong perimeter vulnerability scanning is more than a check for exposed weaknesses. It depends on clear authorization, a defined scope, and a consistent process for reviewing findings and assigning fixes. Keep those steps connected, and scan results can become useful evidence for security and development teams instead of another unprioritized alert list.
ReadySECURE’s Free Scan provides an authorized starting point for a target you’re permitted to assess. It uses six industry-standard scanners, includes a prioritized report, and attaches a signed authorization record to the results. No credit card is required for the first scan. Confirm that you own or have permission to assess the target before submitting it.
Use the findings to decide what needs validation and what your team should address first. As your infrastructure changes, consider how recurring scans can support a consistent review process.
Start an authorized scan with ReadySECURE Free Scan and take a clear first step toward reviewing your external security.
Frequently Asked Questions
What is the difference between perimeter scanning and a penetration test?
Perimeter scanning automatically checks approved internet-facing assets for exposed services, known vulnerabilities, and configuration issues. A penetration test is a separate, scoped assessment that attempts to determine how weaknesses could be used to reach systems or data. Scanning can help identify where closer investigation is warranted, but it doesn’t prove that a system is secure or provide the same type of assessment as a penetration test.
Can perimeter scanning cause downtime for my website or API?
It can affect a service, depending on the scan method, intensity, and target environment. Some checks send requests that could add load or interact with application functions. Before scanning, confirm the scope and testing conditions with service owners, exclude sensitive systems if needed, and choose appropriate timing and frequency. Monitor the service during the scan, and stop testing if you observe unexpected performance or availability issues.
How often should I run a perimeter vulnerability scan?
Set scan frequency according to how often your assets change, their exposure, and your organization’s risk requirements. Reassess after significant changes, such as adding an internet-facing service or changing a major configuration. A one-time perimeter vulnerability scanning assessment provides a snapshot; scheduled scans can help track changes and recurring findings. ReadySECURE Paid Plans add scheduling, history, and trend analysis for ongoing reviews of authorized targets.
Is it legal to scan a website I don't own?
Don’t assume that a publicly accessible website is yours to scan. Get explicit written authorization from the owner or the party with authority over the target, and confirm that it covers the exact domains, subdomains, IP addresses, and scan methods. Third-party hosting or cloud infrastructure may require separate approval. Legal rules depend on the circumstances and jurisdiction, so consult qualified counsel if you’re unsure.
What are the most common vulnerabilities found in perimeter scans?
Perimeter scans can identify exposed ports or services, known vulnerabilities in software, web application or API weaknesses, and SSL/TLS configuration concerns. Results vary with the assets and checks included. For example, a scan may flag a service version associated with a known CVE, but that doesn’t automatically confirm exploitability. Verify each finding against the affected system and its configuration before prioritizing remediation.
How do I prove to my customers that I've scanned my site for vulnerabilities?
Keep the scan report and its authorization record together. A report can document the approved target, assessment results, issue severity, and remediation guidance. ReadySECURE attaches a signed authorization record to each result and provides a prioritized report. If you share evidence with customers, review it first and redact sensitive technical details where appropriate. A scan record shows that an assessment took place; it doesn’t guarantee that a site is vulnerability-free.
What tools does ReadySECURE use for its perimeter audits?
ReadySECURE uses six industry-standard scanners in its scans, including Nmap, OpenVAS, ZAP, TestSSL, and Nuclei. These tools support checks across exposed ports and services, network vulnerabilities, web applications, TLS configuration, and template-based risk detection. The results are brought together in a prioritized report with remediation guidance. Each target requires written authorization, and a signed authorization record is attached to the results.
What happens if a scan identifies a 'False Positive'?
Validate the finding before assigning it as a confirmed vulnerability. Check whether the affected asset, software version, and configuration match the scanner’s evidence, then compare the result with current system details. If the issue doesn’t apply, document why and mark it as a false positive in your tracking process. If uncertainty remains, investigate further or repeat the relevant check, keeping the evidence with the finding.


