

What if the finding count falls, but the same high-risk issue remains? That’s why vulnerability data history and tracking matter. A scan shows what was observed at one point in time. A consistent record helps teams distinguish new findings from persistent ones and assess whether risk is changing.
It’s reasonable to expect a closed ticket or a lower total to signal progress. Yet neither proves that a fix held across later scans or explains what changed. To make a comparison useful, retain scan dates and target scope, and document the evidence behind follow-up decisions.
This guide explains how to preserve vulnerability scan history, compare results meaningfully, and measure remediation beyond closure counts. You’ll learn what to track and how scheduled scans and historical trend reporting can support ongoing review. ReadySECURE provides authorized scanning for targets you control. Paid plans add scheduling, history, and trend analysis, and each result includes a signed authorization record.
Key Takeaways
- Keep scan results, dated history, and remediation status distinct so each record is interpreted accurately.
- Before comparing scans, account for changes in target scope, scanner coverage, and detection methods.
- Use vulnerability data history and tracking to assess age, recurrence, severity, ownership, and validated remediation alongside finding counts.
- Build a repeatable review workflow: authorize and scope scans, compare results, triage findings, assign follow-up, and validate changes.
- Use prioritized findings, severity, and remediation guidance to support decisions, while treating scanning as evidence for follow-up rather than remediation itself.
What vulnerability data history shows that a single scan cannot
A vulnerability scan captures findings for an authorized target at a particular time. Vulnerability data history and tracking preserves dated scan records so a team can compare observations and understand what changed, rather than relying on a single report. Scan history is a dated record of observations across scans, while a current-state report shows what one scan observed at one point in time.
Keep three concepts separate. A scan result is the scanner’s output for a particular run. A historical record preserves that result and its context for later comparison. A remediation status is the team’s assessment of the work, such as whether a fix is planned, completed, or verified. Don’t infer a finding’s status from its presence or absence in a report alone.
This distinction supports vulnerability management principles: identify and assess issues, decide how to address them, and retain enough context to report on the process. A CVE identifier can help teams refer to a publicly known vulnerability consistently. It doesn’t, by itself, identify every affected asset, prove that a specific system is vulnerable, or distinguish one asset-specific observation from another. Record the target and evidence alongside the identifier.
What belongs in a useful vulnerability record?
Preserve the scan date, authorized target, finding description, severity, and relevant scanner evidence. Keep those observations distinct from internal notes, such as the assigned owner, remediation decision, or follow-up date. The report records what the scan observed; the team’s tracking notes capture what people decided to do about it.
Consistent identifiers and descriptions make comparisons clearer. If a scanner changes its wording, a CVE or carefully maintained description can help reviewers recognize related findings. Treat similarity as a prompt to investigate, not proof that two records refer to the same issue on the same asset.
Why one scan cannot establish a trend
One scan is one observation, not evidence that risk is rising or falling. A later scan provides a comparison point only if reviewers understand what was scanned, which areas were in scope, and whether detection conditions changed. For example, if a host is absent from the later scan’s scope, a missing finding says nothing about whether that host was fixed.
Even when the target remains in scope, a finding that no longer appears isn’t automatically a verified fix. Differences in coverage or detection can affect results. Check the evidence and validate remediation before updating the team’s status. That discipline keeps a quiet report from being mistaken for proof of a lasting correction.
How vulnerability findings change between scans
A comparison between scans describes how observations changed, but it doesn’t automatically explain why. A finding may appear, persist, disappear from a report, or return later. Treat these as neutral descriptions of scan results first. Then review scope, evidence, and remediation context before deciding what each change means.
A practical lifecycle can use four labels:
- Newly observed: The finding appears in the current scan but not in the comparison record. It may reflect a newly introduced issue, changed exposure, or a difference in detection or coverage.
- Still present: A comparable scan observes the finding again. This can indicate that the issue remains, but only if the same target and relevant scope were examined.
- No longer observed: The current scan doesn’t report the earlier finding. Record that observation without treating it as proof of a fix.
- Observed again: A finding appears after it was absent from an earlier result. This may indicate a regression or a variation in scope or detection that deserves review.
A finding missing from a later scan isn’t proof that it’s fixed until the scan context is comparable and remediation has been appropriately validated. This distinction keeps a status label from overstating what the evidence supports.
How to interpret new, persistent, and recurring findings
For a newly observed issue, review the scanner evidence, severity, exposure, and affected asset before assigning an owner. For a persistent finding, first establish that both scans covered the relevant target in a comparable way. A recurring result calls for a closer look: check whether a fix was applied, whether the condition returned, and whether the later scan detected the same underlying issue.
These labels describe change, not priority or responsibility. A new low-severity observation may need a different response from a persistent issue on an exposed, business-critical asset. Keep the evidence and the team’s decision distinct, and document why a finding was treated as resolved, accepted, or still requiring work.
Why matching findings across scanners takes care
Different scanners may describe similar conditions with different names, identifiers, evidence, or levels of detail. A CVE reference can help connect records to a known vulnerability when one is available, but not every finding has a CVE. Similar wording alone doesn’t prove two results refer to the same issue or asset. Compare the target and technical evidence before linking records.
If the match is uncertain, preserve both observations and note the reason for your assessment rather than merging them prematurely. That makes later review more defensible and avoids hiding distinct issues inside one record. Consistency matters, but so does acknowledging uncertainty when the available scan evidence doesn’t support a firm match.
For vulnerability data history and tracking to support decisions, compare scans with scope and detection context in view, then record what was validated separately from what was merely absent. If you’re starting with an authorized target you control, a ReadySECURE vulnerability scan can provide an initial set of findings to review.
Which tracking signals show meaningful vulnerability progress?
A lower finding count can be encouraging, but it doesn’t show on its own whether the most important risks were reduced. Useful vulnerability data history and tracking combines several signals, including how long findings remain open, whether they recur, their severity, who owns follow-up, and whether remediation was validated. Interpret those measures alongside the asset’s importance and exposure. The same finding can carry different practical weight on an internet-facing service than on a less exposed system.
Activity metrics show what a team did; evidence of reduced risk shows what changed in the environment and whether the change was validated. Keep that distinction visible in reports. A closure count records work marked complete, not necessarily a lasting fix.
Choose measures that answer a specific security question
Start with the decision you need to make. Are long-running findings receiving attention? Are fixes holding? Are owners following through? Choose a small set of measures that answers those questions, define each one, and use the same definitions across reporting periods. Changing a calculation can make a trend appear to improve or worsen when only the measurement changed.
- Finding age: Shows how long an issue has remained open. Define whether age starts at the first observation or the latest observation, and use that rule consistently.
- Remediation time: Can show how long resolution takes, but only when detection and resolution dates are recorded consistently. State what counts as resolved.
- Recurrence or reopening: Flags findings that appear again after being absent or marked complete. Review scope and evidence before treating a return as a regression or a failed fix.
- Ownership and validation: Show whether someone is responsible for follow-up and whether the change was checked. An assigned owner or a completed task alone doesn’t confirm risk reduction.
Build a comparison table without overstating certainty
A useful report places each measure beside what it can and cannot establish. Compare the same assets and scan periods, then pair counts with severity and exposure context. Don’t apply a universal target without a relevant benchmark. Instead, explain what your own measure means and where its evidence is limited.
- Closure count: Shows findings marked complete; it doesn’t prove the fix was validated or sustained.
- Persistent findings: Highlights issues observed across comparable scans; it may be misleading if target scope or coverage changed.
- Recurring findings: Draws attention to a result that returned; it needs review to distinguish a regression from detection variation.
- Risk context: Helps prioritize by severity, asset importance, and exposure; these factors support judgment but don’t replace technical validation.
Report a concise set of consistently defined measures, with the scan period and any relevant scope changes. That gives reviewers enough context to assess progress without presenting uncertain comparisons as proof.
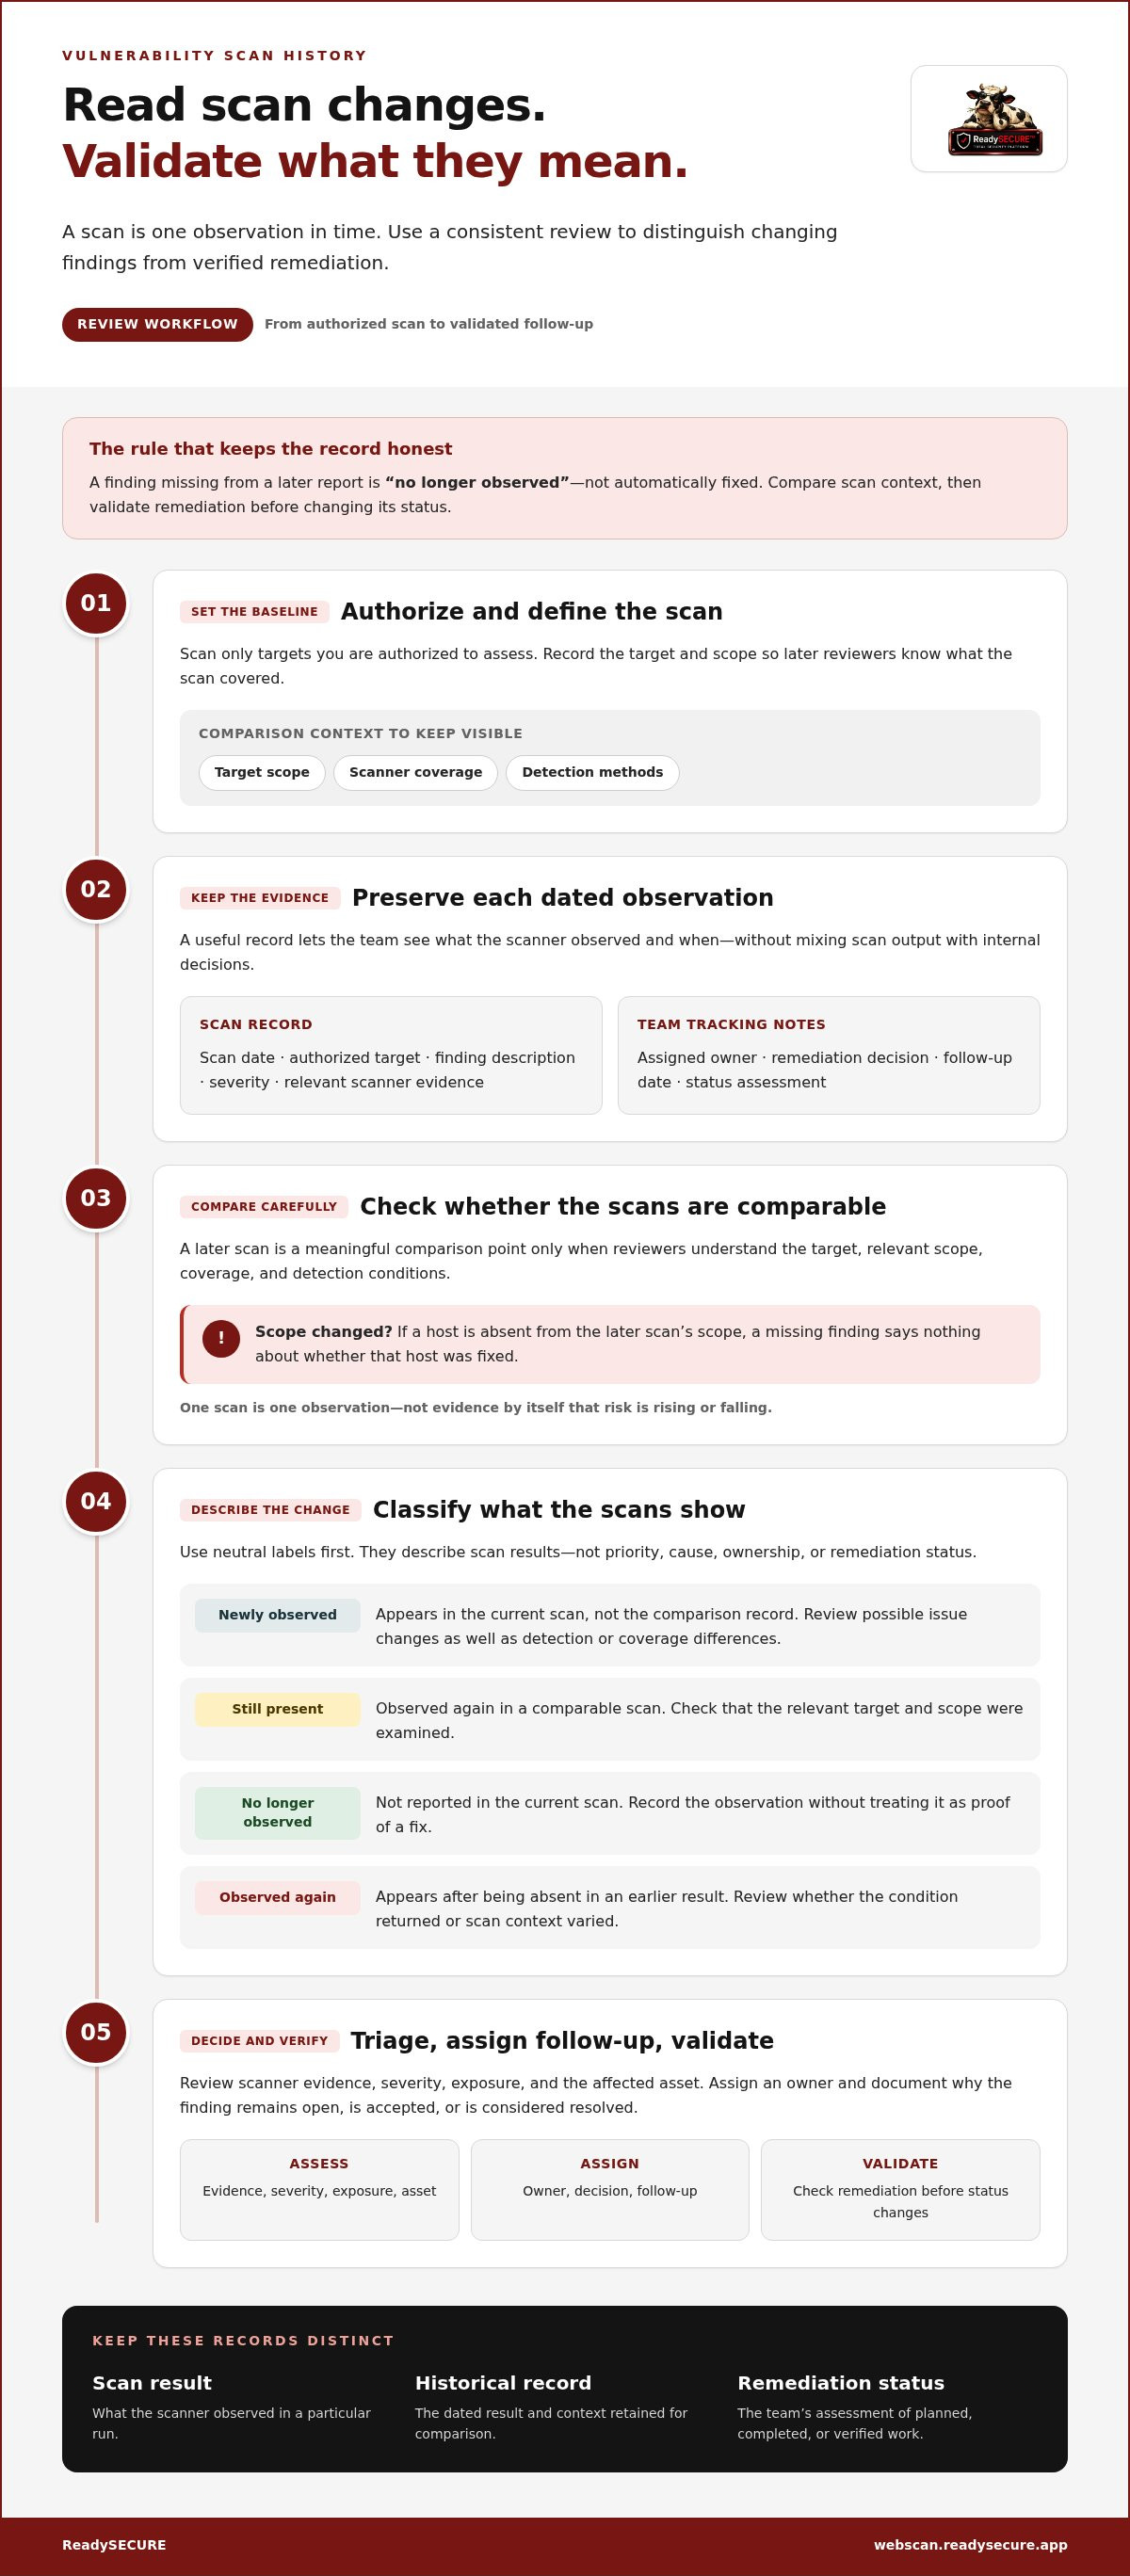
A repeatable workflow for reviewing vulnerability history
History becomes useful when each review leads to a recorded decision and a clear next step. A consistent workflow helps teams interpret scan differences, assign follow-up, and distinguish remediation evidence from reporting summaries. Use this sequence for each authorized review, adapting the records to your team’s established process.
- Authorize and scope. Confirm written authorization and identify the targets and boundaries for the scan. Record the scope so later reviewers can tell which assets were included and recognize any changes.
- Scan consistently. Keep scan timing and approach as consistent as practical. Record the date and note relevant configuration or coverage changes that could affect the findings.
- Compare results. Review new, persistent, missing, and recurring observations. Check whether the targets and scope are comparable before treating a difference as a real change.
- Triage findings. Assess the evidence, severity, exposure, and asset importance. Record the decision and rationale, especially when a finding is deferred or accepted as risk.
- Assign follow-up. Give each finding requiring action an owner and a target date through the team’s established remediation process. Capture the decision and follow-up date with the relevant record.
- Validate the outcome. Use an appropriate follow-up scan or other suitable validation to assess whether remediation addressed the issue. Record the validation result separately from the decision to close a task.
Make scan comparisons consistent and reviewable
Preserve the scan date, target scope, and any material scope or configuration changes alongside each comparison. If two results are difficult to match, a finding disappears unexpectedly, or a possible regression appears, place it in a review queue rather than forcing a conclusion. This gives reviewers a practical way to resolve uncertainty and retain the reason behind the final assessment.
Scan cadence should support timely review while remaining workable for the environment. For broader context on planning scan frequency, see this guide to a continuous security scanning strategy. Whatever cadence a team uses, consistent records make comparisons easier to interpret.
Turn findings into accountable follow-up
An owner and target date make follow-up visible, but they don’t prove that risk has been reduced. For businesses that lack dedicated internal IT personnel to manage remediation and patching workflows, partnering with an IT and cybersecurity provider such as Cloud Choice Technologies can help turn technical scan data into accountable operational action. Document accepted-risk decisions with their rationale and a review point where applicable. Keep remediation records focused on operational decisions, and prepare compliance reporting for its specific purpose. A reporting summary can refer to the evidence, but it shouldn’t replace the underlying scan and validation records.
For additional scanning-program context, explore this overview of automated vulnerability scanning. To put the workflow into practice, start an authorized vulnerability scan for a target you control.
How ReadySECURE supports authorized scanning history and follow-up
Vulnerability data history and tracking depends on more than collecting reports. Teams need authorized scan results they can review, act on, and compare with later findings. ReadySECURE scans websites, APIs, and internet-facing hosts that users control. Its reports prioritize discovered issues and provide severity information and remediation guidance, giving teams a basis for deciding what to investigate and address.
What ReadySECURE scanning provides
ReadySECURE uses six industry-standard scanners, including Nmap, OpenVAS, ZAP, TestSSL, and Nuclei. Together, they provide different views of a target, and the resulting findings inform review and follow-up. The reports guide the team’s decisions; they don’t perform remediation or replace the organization’s own remediation process.
Written authorization is required before a target is scanned. The target must be one you control or have permission to assess. A signed authorization record is attached to each result, providing traceable context for the scan. This keeps authorization associated with the findings rather than treating a scan as detached from its scope.
Use the report as evidence of what the scan identified, then make remediation decisions through your team’s process. Review severity and guidance, assign follow-up as appropriate, and validate changes separately. A scan can support that work, but it shouldn’t be presented as proof that an issue has been fixed or that risk has been eliminated.
When a free scan or ongoing history fits
A single ReadySECURE Free Scan is available for one target. It can serve as a starting point when you want an initial view of an authorized website, API, or internet-facing host. Treat that result as a dated observation for review, not as a continuing record of remediation progress by itself.
ReadySECURE Paid Plans add scheduled scans, history, and trend analysis. These features support a recurring review process by providing additional scan records and a way to consider patterns over time. Use the history as an input to follow-up, not as a guarantee that findings have been resolved. Teams still need to interpret results in context, record decisions, and validate remediation through an appropriate process.
Choose the option that fits your review needs: one authorized target for an initial scan, or scheduled scanning and historical analysis to support ongoing review. Start an authorized ReadySECURE scan.
Make the next scan part of a stronger review
Progress becomes easier to defend when each scan leads to a clear decision, an accountable next step, and evidence that can be revisited. Build that habit gradually: start with one authorized target, establish a useful record, then decide how ongoing review can fit your team’s security process. The value of vulnerability data history and tracking is not simply having more reports. It’s using evidence to make better-informed decisions over time.
ReadySECURE requires written authorization before scanning and attaches a signed authorization record to each result. Its reports prioritize discovered issues and include severity and remediation guidance, giving your team information to assess and follow up on findings. Remediation decisions and validation remain part of your organization’s process.
Choose a practical next step for a target you control. Start an authorized ReadySECURE scan and use the findings to guide your review. A careful, consistent process can turn scan records into clearer decisions and measurable follow-up.
Frequently Asked Questions
What is vulnerability data history?
Vulnerability data history is a set of dated scan records that helps a team understand how observations change over time. For vulnerability data history and tracking, the record is most useful when it identifies the target and scan date, so a reviewer can place each result in context. For example, an application team can compare records from before and after a deployment. The history supports investigation, but it isn’t automatically a remediation log or proof of a fix.
How do you track vulnerabilities between scans?
Keep results for the same authorized scope, compare the technical evidence, and document your review decisions outside the scanner output. A practical record might note that a finding was assigned to an application owner for investigation, then include the follow-up date and validation outcome. If an asset was excluded from a later scan, don’t treat its missing finding as resolved. Confirm the scope and use a suitable validation step before changing its status.
Does a vulnerability scanner keep a history of previous findings?
Scanning services vary in how they retain and present results. ReadySECURE Paid Plans include scan history and trend analysis, while the ReadySECURE Free Scan provides a single scan of one target. A dated report can preserve an observation, but it doesn’t automatically track each finding’s remediation lifecycle. Keep your team’s decisions and validation records alongside scan results when you need to follow a finding through to resolution.
How can I tell whether a vulnerability was fixed or simply missed?
A missing result alone can’t distinguish a fix from a detection difference. Compare the target and scan coverage, then review relevant evidence and changes to configuration or scope. For example, if a route was unavailable during the later scan, the absence of a related finding may not reflect remediation. For an important issue, confirm the change with a suitable follow-up scan or another validation method that tests the affected condition.
Which metrics are useful for vulnerability remediation tracking?
Useful measures include finding age, remediation time, recurrence, ownership, and risk context. Define how each is calculated before comparing reporting periods. For example, decide whether age begins at first detection or the latest observation, and use the same start point consistently. Closure totals can show recorded activity, but they don’t establish that a fix was validated. Interpret measures alongside severity, asset exposure, and any findings that return.
Can vulnerability scan history support compliance reporting?
Yes, historical scan records can contribute evidence about assessment dates and observed changes, but they don’t establish compliance on their own. Map records to the specific control or reporting requirement, and preserve relevant scope, decisions, and validation evidence. For example, a reviewer may need to understand which assets an assessment covered and how an identified issue was handled. Follow your organization’s record-retention policy, and avoid treating scan history as proof that every control is satisfied.
What is the difference between a CVE and a vulnerability finding?
A CVE is a public identifier for a disclosed vulnerability; a scan finding is an observation about a particular target produced by a detection process. A finding may reference a CVE, but it can also describe a condition without one. For example, the identifier alone won’t tell a reviewer which asset was affected or what evidence the scan observed. Retain target-specific context with the finding so teams can assess its relevance and compare it accurately.


